
Overview This article should be printed in landscape orientation.
While it may seem daunting at first, it really is possible for you to develop and print color film at home.
"Why should I bother", you ask? Look back at the greats of photography. Weston, Adams, Jackson, Brady, and more, they all did their own developing and printing. Why? Kodak existed while most of them were working, so why didn't they sent their rolls of film to the lab for processing like all the other photographers did? They did it themselves for a very important reason: to really know your film, and to really know how to translate the scene to the photograph you want, you must develop it yourself, and not rely on some lab flunky and luck to do it for you. And if you want to know what kind of picture you've taken, you need to print it big and put it on the wall. In a simplistic sense, until you can control each stage of the making of your photo, shooting, developing, and printing, you are doing only one third of the photographers job; you're a skilled camera operator at best while someone else, or even a dumb machine, is doing the other two-thirds. This tutorial is provided to give you an idea of what the rest of the process is like, what it requires, and maybe what to expect.
The primary difference between color developing and B&W developing is the issue of rates. Black & white emulsions have a single layer (or two almost-identical layers in the case of variable-contrast paper), so the rate at which the developer soaks into the emulsion isn't as important as the total amount of developer that enters the emulsion. For example, you can develop in cold developer (slow rate) as long as you increase the time of development with no ill effects.
The same is not true for color development. Color emulsions are (for this simplified discussion) three layers thick, each layer responding to and developing into a different color. If the developer soaks in too fast, the lower layers will develop faster than expected (too warm), and the film will come out tinted. The same is true for cold development (too slow), where the top layers will be developed faster than the bottom layers.
The main rule in color development is constant temperature and consistent times. beyond that it is very much like B&W developing. Except color darkrooms are completely black.
Color film and color papers respond to all colors of light. Black & white film does too, but not B&W paper. Consequently, B&W darkrooms can operate with a safely light on during enlargement and paper developing. Color darkrooms can't. Any light in the darkroom will expose the paper, so enlargement is done in complete darkness. But development can be done with the lights on. Here's why:
Equipment
There are two main pieces of equipment needed to develop color film at home: the processor and the enlarger.
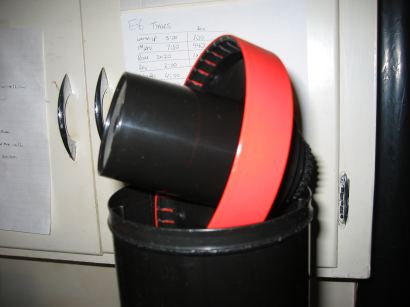
The first and most important is the processor. The processor does one main thing: maintains a constant temperature. There are a number of processor configurations. The simplest is a deep tray with a heater. To develop color film you load the film onto reels in the dark, put them into a "daylight" tank (a light-tight canister with an opening at the top where chemicals can be poured in and out that will not admit light through the use of light traps built into the lid). You then put the tank into the water bath, along with beakers of all the chemicals you'll need. With the aid of a stopwatch, you pour each chemical into the tank for the allotted time, agitating constantly, then pour them out when you are finished. It's rudimentary, but it's cheap. Print trays can also be used in a similar fashion, by placing developing trays into a larger temperature-controlled bath of water.
The next step up in processors is the slot processor. It is a large rectangular tank of water that is held at the appropriate temperature with a circulating heater. Inside the tank are the slots, each of which can be filled with a different chemical. Processing is done in complete darkness, and the film, usually sheet film, is placed into the developer slot and gently agitated, and after the development time it is removed and placed into the next slot. It is a more hands-on experience, but it's a bit slower. It works best if your tank is the same size as the film you are processing. These can be used for processing prints, but the size of the slots must be large enough to accommodate the larger print size.
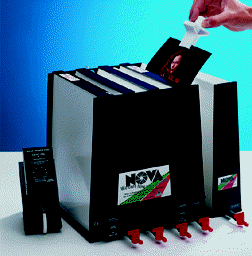
Nova Slot Processor photo courtesy Jobo USA.
The next step up, and the one most home processors use, is the rotary-tube processor. This is a large water bath with room on the side to hold chemical bottles. The main part of the processor is a water tray into which the tube with your film is placed. At one end there is a rotating magnet or cog to which your tank will attach. The rotating motor will rotate the tube back and forth until you shut it off, so all the agitation is taken care of. The bottom part of the tube will sit in the water bath to maintain the temperature of the film and chemicals. Some processors also have a "lift", and device with a lever that allows you to tilt the film tube up and drain its contents. The lift also has a funnel-like opening to allow you to pour chemicals into the tube without removing the tube from the lift. Rotary processors are equally at home developing film or prints. Jobo is the most popular brand.
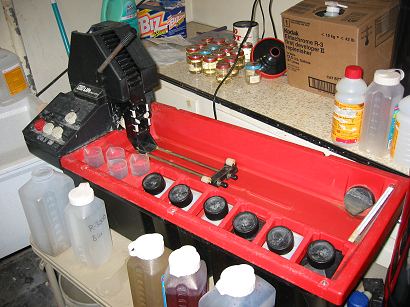
The Jobo CPA processor, with 6 1L chemistry bottles and 4 graduates.
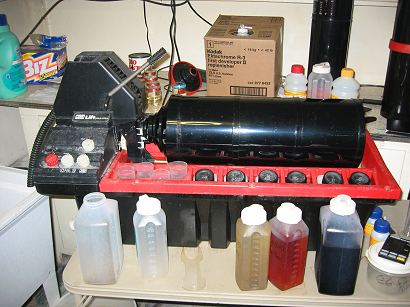
...With the tube for 20x24 inch prints mounted (in foreground are
the developer, color developer, and blix for the R-3 chemistry.
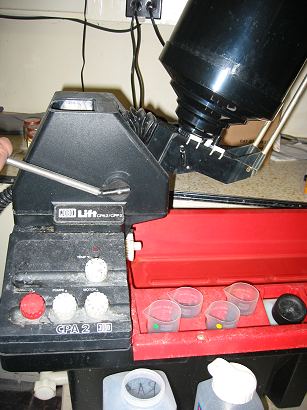
The Jobo with the lift raised by hand. Used chemicals
drain out the tube to the far left, and new chemicals
are poured into the funnel at the top of the lift.
Here you see part of the light trap built into the lid of a processing
tube. Chemicals poured in the the top (to the right here) flow into
the cup, and when the tube is horizontal the fluid leaks out of the
top of the cup into the tube.
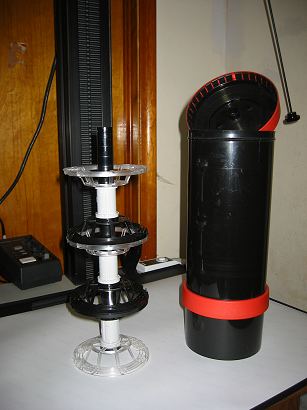
This is the assembly for processing 4x5 sheet film.
Each reel will hold 6 sheets, then the "tree" is placed
in the tube and the lid sealed on. Light-tightness in
ensured because the fluid added to the tube flows
thru the center tube to a light trap at the bottom.
The next step up would be automatic rotary-tube processors, where the entire process can be programmed, and the machine will handle the rotation, filling and dumping of chemicals and rinses, the entire process. They get pretty expensive.
The top of the line in home processors are the line processors. These are a series of chemical tanks, all light-tight, with a transport mechanism to move the paper from one bath to the next. Used primarily in pro labs, they consume a lot of chemicals, and must be kept running constantly to be used efficiently. They are rarely found in the home darkroom.
The second piece of equipment is the color enlarger. Designed exactly like the B&W enlarger except for the light source, they tend to be made by the same manufacturers and will be a little more expensive. All color enlargers are of the diffusion type, and have a color filter system built into the light source. The lamp, usually a halogen lamp, shines through a set of three dichroic filters (for this reason color heads are often called dichroic heads). Dichroic filters are made of glass. They have been given a transparent coating of a very exact thickness, just right to allow only one wavelength (color) of light to pass through. The three colors are magenta, cyan, and yellow (to the eye they look green, red, and blue, respectively, because those colors are being reflected off the filter and not allowed to pass). Dichroic filters are used because after extended exposure to bright lights they will not fade. The filters are typically held out of the light path until they are "dialed in". The front of the color head has three dials, M, C, and Y, for adding just as much or as little of each color as needed for the film and paper being used.
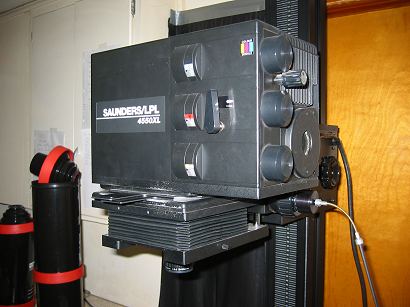
The color head on my Saunders 4x5 enlarger. Blue, cyan, yellow
is the order from the top down.
It is possible to use a standard B&W (tungsten lamp) enlarger for color printing, but you'll need a set of color filters to use while printing.
Color Negative Developing
The process of developing color negative film is much like that for developing B&W film. The process, designated C-41 by Kodak, involves a developer and a combined solution of bleach and fixer, known in the lab as blix. The developer acts like B&W developer, reducing exposed grains of silver bromide to black silver metal. The bleach then oxidizes the solid silver and dissolves it, while at the same time changing some previously-colorless dye molecules around each grain of silver so they are now intensely colored. This way everywhere the light hit the film a dye cloud is formed. The film is designed to that blue light exposure will develop the yellow dye, red will develop the cyan dye, and green will develop the magenta dye, thus producing the complementary color set we see in color negative film. The fixer part of the blix binds the silver and washes it away. It is the equivalent of a very rapid fixer, because the intent is to wash out all the silver, not just the silver not involved in making the image. Rinsing is rapid, rarely taking more than four or five minutes.
The developer is, like B&W developer, sensitive to oxidation, but the blix requires oxidation to work properly. Long-time storage of the blix will result, however, in the formation of sulfur deposits in the bottle.
C-41 chemistry can be purchased in a number of forms. There are several kits available with all the needed chemicals, including a rinsing agent (that both wets and stabilizes the emulsion for spotless drying). There are also room temperature kits available, that are designed to slow the chemistry down enough that the exact temperature of processing becomes not so important. Results form these kits can be iffy, however.
Reversal Film Developing
Developing reversal film (also called "slides" or "transparencies") is much more tricky than negatives. The reversal process, that of making the portions of the film that were not exposed show up, is the reason why. The chemistry is designated E-6 by Kodak, and they sell a nice 5L kit for home use.
The development process starts with a first developer, much like a B&W developer, reducing the exposed silver to solid metallic silver. This silver is then deactivated towards further chemistry. What is on the film at this point is a negative of the scene that was shot. The film is then rinsed well and from this point on the process can be done in room light (but isn't if you are using a rotary tube processor, more for convenience than necessity).
Next comes the reversal exposure. In bulk labs this is done with a fluorescent lamp, but the kits also provide a chemical agent that does the same thing. The reversal exposure is needed to expose all the previously undeveloped silver bromide, to activate it for the next developer.
The color developer is more oxygen sensitive than the first developer, and is used to develop the just exposed grains of silver bromide in the film. This developer creates a positive image made of 'active' silver metal.
Then comes the pre-bleach, to deactivate the color developer and rewet the film.
The bleach is then added. It is best to have the bleach well oxygenated by using a fish tank bubbler or by putting it into a half-empty bottle and shaking it up for 30 seconds. Here, as in color negative film, the silver created by the color developer (corresponding to the positive image) is dissolved and the color dye clouds are formed around each grain.
The the fixer is used to dissolve all the silver into solution and remove it from the film. Again, it is a very rapid fixer, and rinses out quickly.
Finally, the film is dipped for a moment in a solution of distilled water and final rinse, containing a wetting agent and an antifungal agent.
The entire process takes about 40 minutes, and is done at 38 degrees C (100 degrees F).
Printing the Color Negative
Printing a color negative is very difficult to do without a color enlarger. This is because for each pack of paper and for each film you must establish the exact color filtration that gives you a neutral print. Finding the filter pack the first time can be a time consuming process, but if you have some nice shots of a gray and white card, and a color panel, then the process is sped up a lot. The filter pack, usually something like 35Y20M0C, describes the settings of the color filters in the enlarger that will allow you to make a print of a gray card that will look gray. The filter pack will vary for each film you use and for each paper, and will sometimes change as the paper ages. Good recordkeeping is essential if you don't want to repeat this somewhat boring task. By the way, paper for printing color negatives has a blue dye on the surface, meant to compensate somewhat for the orange mask of the film.
Once the filter pack is established, you can start printing some of your negatives. The process is much like B&W printing, but after the exposure is found you must spend a little time with fine-tuning the colors for that negative. All color adjustments will be close to the primary filter pack, and are used to adjust the lighting of the scene, not the film/paper combination. One aspect of this process is how to deal with the colors themselves. Since you are printing a color negative, if you add cyan to the filter pack, your print will look like you removed cyan from the image. If your first print of a negative looks too yellow, add some yellow to the filter pack to compensate. That's the counter-intuitive way color darkroom lovers start thinking.
Now that you have an exposed paper (which you have made in utter darkness), place it in a developing tube and turn on the lights, or place it into a slot and get it developed right away, still in the dark (once you've stopped the development and gotten the print into the blix you can turn the lights back on). The development process for negative papers is called RA-4 by Kodak, and while some RA-4 kits exist for home use, getting small bottles of RA-4 Replenisher is a nice way to go. Replenisher chemicals are meant to be reused. They are first mixed by diluting the stock solution, then adding a little 'starter' to get some bromide ions in the developer, so it won't be too powerful at first. From then on you collect the waste, and for every liter you add about 400 mL of fresh replenisher and reuse the chemical. It's a nice way to stretch your chemicals, and your budget.
The chemicals you use are the developer and the blix. Sometimes a stop bath (just like B&W) is used after the developer. And this process is fast! The developer takes 45 seconds, and the blix only 2 minutes. Again, because a very rapid fixer is used, rinsing takes only two or three minutes.
Printing the Transparency
Printing a transparency is also done using a reversal process. There are two reversal chemistries, with very different properties and behaviors.
Designated R-3000 (for home use) or R-3 (for commercial labs), the Ektachrome process by Kodak is the easier one to use. Unfortunately, R-3000 is no longer being made for sale in the United States. I'm currently using a commercial-sized supply of R-3 replenisher and it's working out very well. When printed on Kodak Radiance III or Fuji Type-35 paper, it is remarkable easy to get a great print using this process. The R-3 process uses a first developer, then a reversal exposure, then the color developer, followed by the blix. The R-3000 process omits the reversal exposure, instead including a chemical reversing agent in the color developer.
The second process has a better reputation than R-3000, but I don't think it's earned any more. Ilfochrome, with chemistry designated as P30 (home use) or P3 (commercial), used to be known as Cibachrome. This process differs markedly from the Ektachrome process in that all the dye molecules are already present in the paper in their fully-colored form, and the chemistry is designed to bleach out the unwanted dyes in the image. This process uses a developer, a bleach (unlike the Ektachrome bleaches, this bleach is oxygen sensitive and works on dye molecules rather than silver metal), and a fixer. The P30 chemistry comes in a 2L kit, and is a bit expensive. Famed for the beauty of prints, the richness of colors and the deepness of it blacks, many of those qualities are things of the past, before the reformulaton of the P30 chemistry. The current chemistry and paper suffers from crossover (one color printing as a slightly different color) and it's maddening inability to get a proper filter pack, so I've abandoned this process. Most of the time it's very slow work, but when it does work, it is glorious!
One problem that all reversal processes suffer is high contrast. With negative film and paper, a partial exposure can be fixed in the enlarger. Because there is no reversal step, you can expose a negative as deep or thin as you like. If it's too thin, print it on high-contrast paper; if it's too deep, print it on low-contrast paper. With reversal film you lose that freedom. Because you are reversing the image, you see only the part of the film not originally exposed. If your shot is overexposed, there is little hope of rescue, and vice versa for underexposure. Consequently, there are few to no options for controlling contrast when printing reversal film. One technique that has arisen to assist printing Ilfochromes is the contrast mask. It is a B&W film that is sandwiched with the transparency and partially exposed. Any place the transparency was too thin the mask will be exposed more, and where the transparency was too dark the mask with be clear. Then the developed mask and the transparency are again sandwiched in the enlarger, rendering a lower contrast image of the original slide. Since Radiance paper is of lower contrast than Ilfochrome, this technique is rarely used in R-3 labs.
Color Chemistries
Cautions
Some aspects of doing color chemistry at home can be hazardous. The chemicals used in color developing are stronger than those used in B&W, and gloves are recommended to those with sensitive skin, and contact with chemicals in concentrated form is always discouraged. Additionally, if you are on a septic system the disposal of bulk amounts of chemicals can kill the bacteria if dumped too much at a time.