
Introduction

Large format. To some photographers it means an old technique that isn't needed any more, to others it means an esoteric type of photography used only for very specialized needs, and to some of us, it's the only true form of photography! The old image of a photographer, bent over, looking into an enormous camera with a cloth over his head is an enduring one. Yes, shooting large format is more difficult than shooting 35mm, but the rewards, an enormous piece of film with your image on it, is sure worth the extra effort.
Large format refers to any film larger than 2 1/4 inches across. Large format film is usually found in individual sheets, not in rolls, with 4 x 5 inch size being by far the most popular. 5 x 7 inches and 8 x 10 inches are also popular film sizes, and even some cameras with sizes smaller than 4 x 5 can be found.
Cameras that accommodate 4 x 5 film are likewise larger and heavier than 35mm cameras. They are simple cameras, typically with no electronic parts, no meter, usually no focusing system other than a ground glass in the back upon which the image is projected by the lens (upside down and backwards!). The lenses, because they must illuminate an area at least 6 inches across (for 4 x 5 film) are large and expensive. Each lens typically has its own shutter and iris.
Shooting large format is no simple and quick task; it is a deliberate, time consuming process fraught with opportunities to mess up the image. There is no such thing as a large format snapshot! Checklists and routine are the name of the game here. Due to the expense of buying and processing 20 square inches of film for each shot, large-format photographers learn quickly to edit his shots before he takes them, not later on the light table. Keeping careful records of camera settings will help a great deal in the early years of shooting large format, but soon you too can be turning out those remarkable shots that easily enlarge to perfectly-sharp 20 x 24 inch prints!
Pros and Cons
Pros:
Picture quality: sharpness and smoothness of large-format film is
unparalleled.
More deliberate shots: the nature of the large-format camera will slow
you down and make you think about what you are doing. And the relatively greater
expense per shot means you're less likely to waste film on iffy shots.
Individual shot development: you can tailor the development of each shot
to get the exact exposure you want.
Movements: the real advantage of large-format cameras is the ability to
move the lens relative to the film to change the plane of focus or correct the
perspective.
Cons:
Slow: getting a shot requires several minutes of work. No snapshots here!
Much heavy equipment: a large camera, heavy lenses, film holders, sturdy
tripod, meters and other accessories are the minimum.
Scanning and enlarging requires special equipment: usually expensive
equipment.
And speaking of expenses: film and processing costs are much more
expensive than 35mm per shot.
To get an idea of the resolution available on large format film, here is the full-sized image of a 4x5 inch transparency:
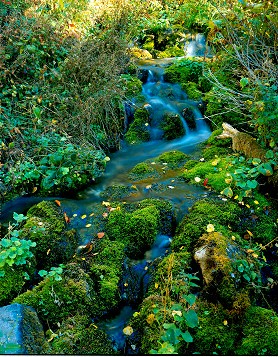
Small Rivulet in American Fork Canyon, Utah
Now here is an enlarged portion of that shot:

And here is an enlarged portion of that shot:

A drum scan of this would look even sharper and smoother.
Equipment
Cameras:
There are two types of large-format cameras.
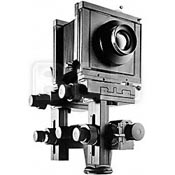 "View cameras", or
"monorails",
"View cameras", or
"monorails", 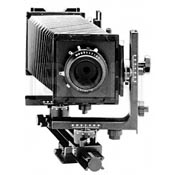 are
used mostly in the studio. They are rails, about 20 inches long, along which two
standards can move. The front standard holds the lens, and the rear standard
holds the film. They are connected by flexible light-tight bellows. Both
standards can be positioned anywhere on the rail to accommodate any aspect of
focusing lenses of different focal lengths. Additionally, both standards can be
tilted forward and back, swung side to side, raised, lowered, shifted from side
to side. More expensive monorails will have gears and gauges to assist the
photographer in reproducing specific movements. Monorails are not meant to
withstand exposure to the elements, and must be returned to a fitted case for
safe transport.
are
used mostly in the studio. They are rails, about 20 inches long, along which two
standards can move. The front standard holds the lens, and the rear standard
holds the film. They are connected by flexible light-tight bellows. Both
standards can be positioned anywhere on the rail to accommodate any aspect of
focusing lenses of different focal lengths. Additionally, both standards can be
tilted forward and back, swung side to side, raised, lowered, shifted from side
to side. More expensive monorails will have gears and gauges to assist the
photographer in reproducing specific movements. Monorails are not meant to
withstand exposure to the elements, and must be returned to a fitted case for
safe transport.
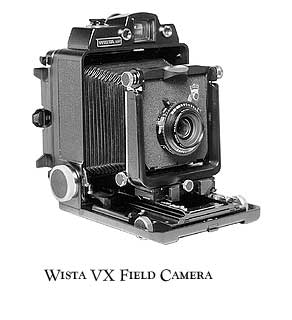 "Field cameras",
or "flatbed cameras", are meant for outdoor use. They are shallow boxes
("bodies") made of wood or metal with a front door that hinges down to become
the "bed". The front standard, normally stored inside the box, can them be slid
out along rails in the inside of the front door. The rear standard is
incorporated into the body.
"Field cameras",
or "flatbed cameras", are meant for outdoor use. They are shallow boxes
("bodies") made of wood or metal with a front door that hinges down to become
the "bed". The front standard, normally stored inside the box, can them be slid
out along rails in the inside of the front door. The rear standard is
incorporated into the body. 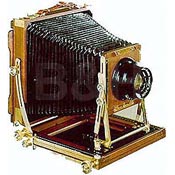 Because
the rear standard is part of the body, the necessarily compact nature of the
front standard, and the more conservative size of the bellows, available
movements are more restricted (but fortunately not needed much in outdoor
shooting situations). Field cameras will take a hit against rock without damage(
and with most metal bodies not even leave a scratch).
Because
the rear standard is part of the body, the necessarily compact nature of the
front standard, and the more conservative size of the bellows, available
movements are more restricted (but fortunately not needed much in outdoor
shooting situations). Field cameras will take a hit against rock without damage(
and with most metal bodies not even leave a scratch).
Cameras have a ground glass back onto which you can project the image from the lens. The image is always rendered upside down and backwards, but you'll get used to it pretty quick. Better backs have a fresnel lens in front of the ground glass to make the image brighter. The ground glass is located in a movable "back". After the camera is focused, the film holder is inserted in front of the ground glass, and the back has springs that allow to ground glass to move backwards to accommodate the film holder. The plane of the film should now be at the exact same location the ground glass was, so, literally, what you see is what you get. Some cameras require you to use a dark cloth to block incident light on the ground glass, other use a set of doors that open up to form a sort of "tunnel" around the ground glass that will block most (but not all) the incident light. I've found that dark cloths are rarely needed, and when they are a shirt or jacket works fine.
Lenses:
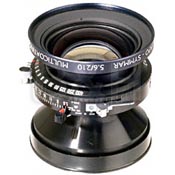 Most large-format lenses
are a combination of three things: the lens
Most large-format lenses
are a combination of three things: the lens
 (a front half and a back
half), the shutter (handling both the aperture and the shutter itself), and the
lendboard. The entire assembly can be swapped out for a different lens by simply
releasing the lensboard and inserting the new lensboard. There are no
large-format zoom lenses. Some lenses, called convertibles, can be used with
only one half of the lens present, to give different focal lengths at reduced
maximum apertures. You'll find that for a single focal-length lens, these are
pretty big. Large-format lenses need to cover the whole film (and some to spare
to allow for movements), so they are designed to produce a very large image
area. Some lenses, particularly the Optars and Ektars, are very light, fairly
fast lenses of the Tessar design. This is a good starter lens, and most used
cameras will come with one of these lenses. As you get better, you'll find some
spare cash to get a better lens, one with a different focal length, perhaps one
with a little more coverage. Each lens you have will need it's own shutter (most
lenses come with their own) and lens board.
(a front half and a back
half), the shutter (handling both the aperture and the shutter itself), and the
lendboard. The entire assembly can be swapped out for a different lens by simply
releasing the lensboard and inserting the new lensboard. There are no
large-format zoom lenses. Some lenses, called convertibles, can be used with
only one half of the lens present, to give different focal lengths at reduced
maximum apertures. You'll find that for a single focal-length lens, these are
pretty big. Large-format lenses need to cover the whole film (and some to spare
to allow for movements), so they are designed to produce a very large image
area. Some lenses, particularly the Optars and Ektars, are very light, fairly
fast lenses of the Tessar design. This is a good starter lens, and most used
cameras will come with one of these lenses. As you get better, you'll find some
spare cash to get a better lens, one with a different focal length, perhaps one
with a little more coverage. Each lens you have will need it's own shutter (most
lenses come with their own) and lens board.
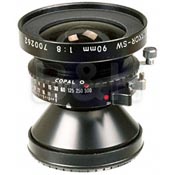
Barrel lenses. Some lenses don't need or use a shutter. They will have an aperture, but they depend on a shutter built into the camera body itself. The lenses are called "barrel lenses", and they only work with "press cameras", field cameras that have folac plane shutters (the very-available Speed Graphics are the best example). Barrel lenses are cheaper because of the fewer operating parts.
Because the film is so much larger than 35mm frames, focal length is also extended. A 90mm LF lens is equivalent to an 28mm lens on your SLR. And a 210mm lens is equivalent to a 70mm. And as with all longer lenses, the depth of field becomes much narrower, so the lens must be stopped down much farther than you are accustomed to in smaller formats (f/16 to f/64 is very common, rarely anything wider is used). But the depth of field problem is nearly as bad as it seems, because with camera movements the plane of focus can be moved anywhere you need it, compensating for the DOF limitations of these focal lengths.
Film Holders.
There are two types of film holder being used for sheet film, plus roll holders that fit on the back of a camera for exposing 120 roll film.
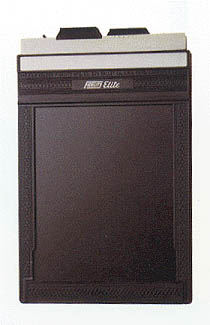 Sheet
film holders are two-sided units just under an inch thick. Each side has a place
to insert film, and each has a "dark slide" to keep the film from being exposed
before it is placed into the camera. To use them, you need a darkroom or what is
called a "changing bag", a sort of portable "dark bag" with two sleves for your
arms (put the empty holders and a box of film inside, seal it up, then reach in
and load the holders, one sheet at a time). Loading holders is no trouble at all
once you've practiced a bit with an test sheet in the light. Sometimes you must
watch for dust, though, that can get on the film before exposure, creating dust
spots. Sheet film holders have places where you can write to help keep track of
your shots, and the dark slides have a white stripe on one side (white-side out
means unexposed) and a black stripe on the other (black side out means exposed).
After you've exposed both sides, you put it away until you can safely remove the
film and replace it with fresh.
Sheet
film holders are two-sided units just under an inch thick. Each side has a place
to insert film, and each has a "dark slide" to keep the film from being exposed
before it is placed into the camera. To use them, you need a darkroom or what is
called a "changing bag", a sort of portable "dark bag" with two sleves for your
arms (put the empty holders and a box of film inside, seal it up, then reach in
and load the holders, one sheet at a time). Loading holders is no trouble at all
once you've practiced a bit with an test sheet in the light. Sometimes you must
watch for dust, though, that can get on the film before exposure, creating dust
spots. Sheet film holders have places where you can write to help keep track of
your shots, and the dark slides have a white stripe on one side (white-side out
means unexposed) and a black stripe on the other (black side out means exposed).
After you've exposed both sides, you put it away until you can safely remove the
film and replace it with fresh.
Quickload and Readyload are the names of the other kind of holder. This sheet film is purchased in a paper sleeve, two films each. When you are ready for exposure, the film packet is inserted into the special holder, the sleve withdrawn, and the exposure made. The sleeve is pushed back in, and then you can turn the packet over an expose the other side. Polaroid sheet film and prints (which can be proccessed instantly) operate on the same principle, but Polaroid packets have only a single sheet, plus some chemicals for processing.
Meters:
 Large-format cameras
have no meters. You'll need your own. If you have an SLR camera that you want to
bring, you can set the SLR ISO to match the large-format film ISO, and then use
your SLR camera reading to set your exposure. But most large-format
photographers end up with thier own spotmeter or incident meter (or one meter
that does both).
Large-format cameras
have no meters. You'll need your own. If you have an SLR camera that you want to
bring, you can set the SLR ISO to match the large-format film ISO, and then use
your SLR camera reading to set your exposure. But most large-format
photographers end up with thier own spotmeter or incident meter (or one meter
that does both).
Tripod:
There is no hand holding of large-format cameras. Despite what you've seen in the movies (newspaper men at a press conference, etc.), if you want any depth of field, you'll need a tripod to steady the long exposures you have when the lens is stopped down. A good heavy tripod is best (minimizes vibrations), but even a light one will do if you are careful. With a camera as large as these, wind is the enemy. It doesn't take much of a gust to shake the camera, but you'll soon learn where best to stand to block any gusts, and how to look into the wind and recognize gusts heading your way (tall grass is our friend).
Accessories:
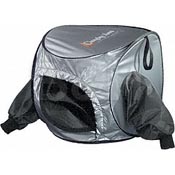 You'll also need some
thinks like cable releases, maybe a dark cloth (to block the light when viewing
the focusing screen, and a loupe magnifier to looking at the screen during
critical focusing. Sometimes things like changing tents (portable darkrooms) are
handy if you are in the field and need to reload you sheet film holders.
You'll also need some
thinks like cable releases, maybe a dark cloth (to block the light when viewing
the focusing screen, and a loupe magnifier to looking at the screen during
critical focusing. Sometimes things like changing tents (portable darkrooms) are
handy if you are in the field and need to reload you sheet film holders.
Photos courtesy B&H Photo, the best mail order house in the US.
Movements
Movements. The real advantage large-format cameras have over fixed-lens cameras (both small- and medium-format). Movements mean to move the lens relative to the plane of the film. SLR cameras have a fixed lens, so the focal plane is always parallel to the film plane. This means that an SLR can deepen its focus only by closing down the lens and increasing the DOF. But large-format cameras are not restricted this way. If I need to focus on an interesting design in a dried mud flat, I can tilt the lens forward a bit, which moves the plane of focus down also. If the mud is flat, I can have the entire mud flat in focus with the lens wide open! When I close the shutter down I am still widening the depth of field, but now it is getting wider relative to the new plane of focus (up and down in this example). So by using lens tilt I can make up in large part for the lack of DOF the longer lenses have.
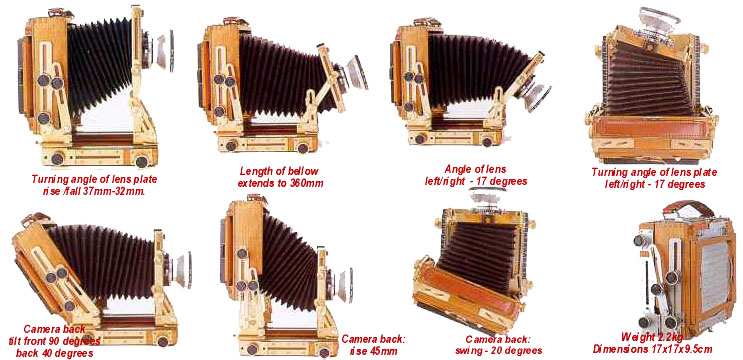
Camera movements demonstrated by the Shen Hao 4x5 field camera, as seen in a
recent advertizement.
The other advantage of movements is to correct perspective. We've all taken shots of a building, and despite out best try, got a severely keystoned photo. The keystoning (looking smaller towards the top of the building) is caused because the film plane was at an angle to the plane of the building (usually the face). With a large-format camera you can set up the camera back to exactly parallel the face of a building. I know what you're thinking: if you set up parallel, you'll be looking at the bottom half of the building, and half your shot will be the ground. Here's what you do: raise the lens up. By raising the lens (but not the back standard), the camera will see only what is above it, while the film plane hasn't moved. This correction can also be applied to the side using lens shift.
By using tilt and shifts, you can correct most of the problems that fixed-lens cameras encounter. It will take a little longer to set up the shot, but the shot you get looks so much more natural to the eye.
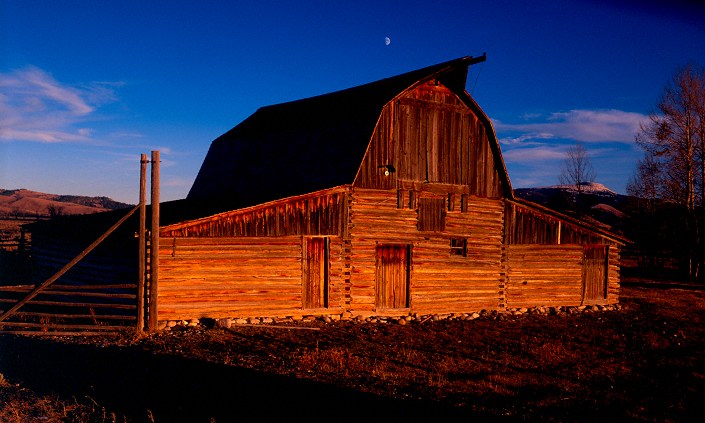
This shot of a barn on old Mormon Row in Teton National park was made using
three movements: the lens was shifted up slightly and to the side slightly to
preserve as best I could the dimensions of the lit face of the barn, and also
there was some side-tilt to keep the face of the barn in the focal plane.
Practical Considerations
There are a few things you must consider before buying your first large-format camera.
Where will you get your film developed? If you are shooting black & white film, then developing it yourself is certainly not difficult. But if you want to shoot color film, especially reversal film, then you must have a pro lab nearby. Most pro labs will unload your holders and develop your film for less than a dollar a sheet (cheaper if you unload the holders yourself and bring the film to the lab in the nifty triple-enclosed box the film originally came in).
Or you might consider processing it yourself at home (please refer to my Home Color Darkroom article on this site for a detailed discussion). This is a much more expensive option (at first), but can be a lot of fun. Processing it yourself gives you the added ability to tailor-process your film (for partial-stop pulls and pushes).
Another consideration is: what will you do with your marvelous big sheets of film? Large-format enlargers are much more expensive than small- and medium-format enlargers, and processing trays or tubes are likewise larger. Large-format film enlarges to 16x20 or 20x24 very nicely, and you'll be wanting to print it that big. Are you ready to move your darkroom to that size, or are you willing to pay a pro lab to make those big prints for you? Also, big prints cost a lot more to frame than smaller ones, so plan ahead for that, too.
Scanning, too, requires some special equipment. There are many scanners that come with 35mm transparency adapters, but not many will scan a 4x5 or larger film sheet. Those that do are typically flat-bed scanners with either trays beneath the lamp, or ones with a separate lamp assembly the fits above the film. In either case, there are compromises when using a flat-bed scanner, usually the quality of the scan. Higher-quality scanners for 4x5 film exists, but get very expensive very quickly. The ultimate is the drum scan, which you can have done for under $100, typically. Also consider that 4x5 scans run 300 to 600 MB for a single file, so if you plan to do any digital processing on your computer you'll need a lot of RAM to handle the file (you'll need 1- to 2-GB of RAM for the big scans). If you are scanning for the web you can make much smaller files, but if you are scanning for large-format digital prints, you'll want the highest resolution (hence largest file size) possible. The best digital prints are made on the very expensive LightJet printers (or the like, there are several brand names out there) that print digitally directly onto RA paper (the type used to print color negatives). These prints can be absolutely beautiful, and most large-format photographers sell these prints in their galleries. I've found printing up to 20x24 in my home darkroom to be the cheapest option for me, your mileage may vary.
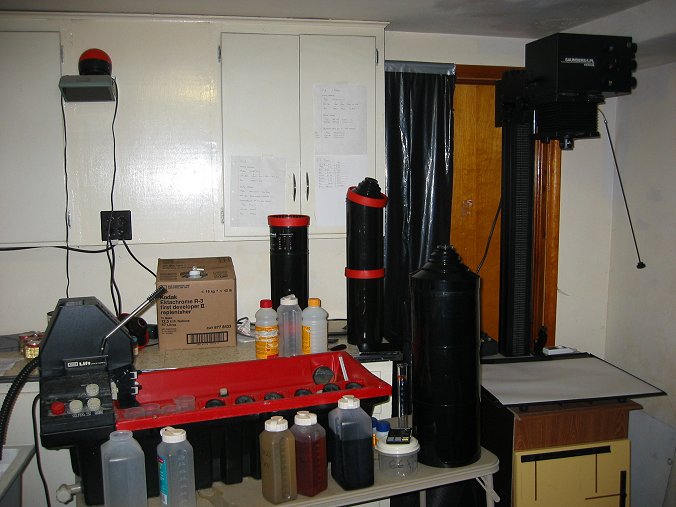
For example, here is my home large-format color darkroom. To the right is a Saunders 4x5 enlarger. In the center you see the Jobo CPA processor (will handle processing tubes for both film and paper up to 20x24 inches). You can see both the 16x20 paper tube (long thin on in the back with an orange ring in the middle )and the 20x24 tube (largest black tube). Not pictured are the sink and large basins for rinsing prints, the chemical storage closet, the dark closet for storing papers of various makes and sizes, and the numersous accessories that accompany the enlarger (film holders, lenses, alighnment tools). This photo represents about $2500 worth of equipment.
So, you want to give it a try.
Well, first you'll need a camera and a lens. Get something used, 4x5 format. You can get a pretty nice used Graflex Speed or Super Graphic camera on eBay for about $400. These will typically come with a lens in working order, and maybe a couple film holders. You can use your SLR for the meter. Graphlex cameras will resale for what you paid, so don't worry too much that you'll get a camera you can't get rid of (they haven't been produced since 1973, so the market had pretty much stabilized a decade ago). These are metal cameras that stand up to abuse fairly well. Any lens in the 120 to 140mm range will do nicely.
Film. Try your hand at B&W first. You can develop these at home with minimal trouble, and then contact print them (but I'll warn you now it will only make you hungry for bigger prints).
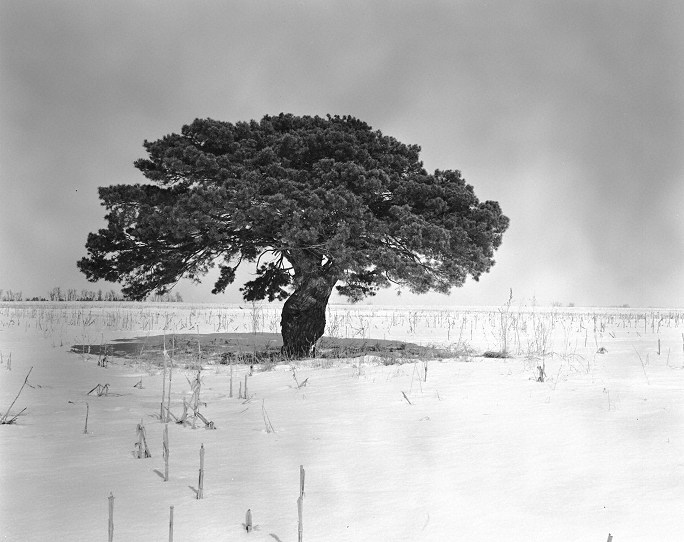
Lone Tree in Cornfield, near SD/MN border, tray developed.
My Shooting Proceedure
Here is what happens when I see something I want to shoot:
1. Get the tripod in position, mount the camera (I use quick release plates to speed this up). Level the camera with a pocket bubble level.
2. Open camera, pull out front standard, put my selected lens in the standard.
3. Open the aperture to its widest setting, press the "press focus" lever to open the shutter.
4. Focus for my preliminary examination of the scene. Sometimes I select the wrong lens, and need to replace it. Compose the shot.
5. If there is anything rectilinear in the shot (like a building), I correct
the perspective by using rise, fall and shift.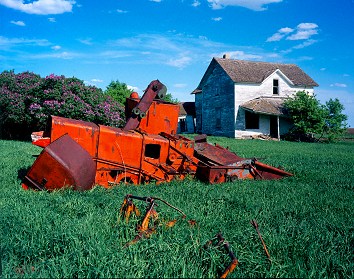
6. Check critical focus. Since the depth of field is limited, here is where I use lens tilt to bring as much of the scene into sharp focus with the lens wide open, then stop the lens down to F/16 or below for shooting.
7. Close the press focus lever. Double check by looking into the lens.
8. Select an unexposed film holder, insert it into the camera back.
9. Set the shutter speed, and cock the shutter. Double check settings.
10, Withdraw the dark slide, check that nothing is changed in the scene, wait for the wind to die out, and release the shutter.
11. Replace the dark slide (black-side out), and pull the holder out of the camera. Write my shooting notes for that shot.
12. Remove the lens, close up the camera, pack everything back to the car.
And that's the quick version!