
Bryce Canyon National Park is an amazing place to shoot.
The park itself is lies along the edge of a cliff, the pink cliffs, which are
the upper-most step in Utah's Grand Staircase. The canyon is named after
Ebenezer Bryce, an early Mormon settler who homesteaded at the mouth of the
Canyon in what is now the town of Tropic. Brother Bryce cut a road into the
canyon to harvest timber, a road used by other settlers in the area, so they
called it Bryce's Road, and the canyon, Bryce's canyon. The settlers didn't seem
to say much about the oddity of the canyon's appearance. Being a practical
people, they were more concerned with immediate needs. The famous quote from
Brother Bryce, "It's a hell of a place to lose a cow" is not just a joke, as you
will see when you hike down into the canyon.
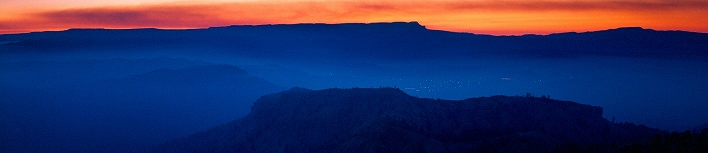
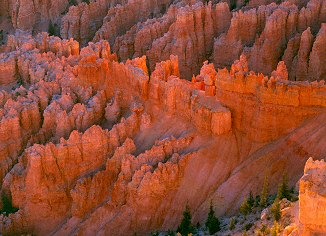
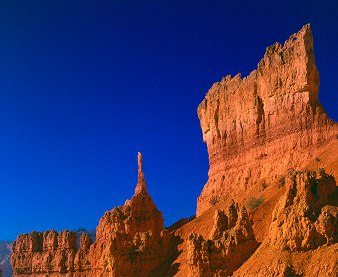
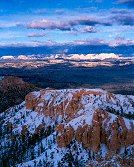
Tropic, Utah, pre-dawn, shot from Bryce Point.
Bruce Wilson, 2002
Bryce Canyon National Park
 is
located about 15 miles East of Pangwitch, Utah, which is the nearest city of any
size. Many visitors like to stay at a motel or B&B in Pangwitch, or at one
of the many motels or tourist cabins along the road to Bryce. The National Park
also has an abundance of camping, divided into two campgrounds. The North
campground has good access to Sunrise Point (a popular site because it is a high
overlook toward the Easternmost side of the main amphitheater, good for early sunlit
shots with a mostly head-on light) and to Sunset Point (the most popular tourist
viewpoint). The Sunset campground is close to Sunset point, and it's the one
where I always camp. In total there are 204 campsites available, and some
additional backcountry camping for those who want to spend a day or two below
the rim. Camping is $10 per night, first-come-first-served, and fill up by 5 pm
on weekdays, by about 1 pm on weekends. The camper loops are separate from the
tent loops, and there is water at the restrooms (showers are at the Visitors
Center only). There are no reservations. To claim a spot, leave something on the
table then go back to the fee station at the entrance to fill out the envelope
and pay for the site. Keep one stub to mark your campsite, and put the other in
the Occupied Campsite Board. Most of the park lies at 8000 feet altitude (2500
meters), so those not accustomed to altitude might have a bad night's sleep that
first night, and will need to stop way more often to rest during exertions.
Also, the air at Bryce is very dry, and you will lose a lot of water. Carry
extra water, and drink a lot, especially if you are hiking at all. They
recommend 2 quarts (2 liters) per hour of exertion, and in summer they aren't kidding.
For up-to-date information, tune to 1590 KHz and 1610 KHz am for park and
shuttle information as you drive in through Red Canyon.
is
located about 15 miles East of Pangwitch, Utah, which is the nearest city of any
size. Many visitors like to stay at a motel or B&B in Pangwitch, or at one
of the many motels or tourist cabins along the road to Bryce. The National Park
also has an abundance of camping, divided into two campgrounds. The North
campground has good access to Sunrise Point (a popular site because it is a high
overlook toward the Easternmost side of the main amphitheater, good for early sunlit
shots with a mostly head-on light) and to Sunset Point (the most popular tourist
viewpoint). The Sunset campground is close to Sunset point, and it's the one
where I always camp. In total there are 204 campsites available, and some
additional backcountry camping for those who want to spend a day or two below
the rim. Camping is $10 per night, first-come-first-served, and fill up by 5 pm
on weekdays, by about 1 pm on weekends. The camper loops are separate from the
tent loops, and there is water at the restrooms (showers are at the Visitors
Center only). There are no reservations. To claim a spot, leave something on the
table then go back to the fee station at the entrance to fill out the envelope
and pay for the site. Keep one stub to mark your campsite, and put the other in
the Occupied Campsite Board. Most of the park lies at 8000 feet altitude (2500
meters), so those not accustomed to altitude might have a bad night's sleep that
first night, and will need to stop way more often to rest during exertions.
Also, the air at Bryce is very dry, and you will lose a lot of water. Carry
extra water, and drink a lot, especially if you are hiking at all. They
recommend 2 quarts (2 liters) per hour of exertion, and in summer they aren't kidding.
For up-to-date information, tune to 1590 KHz and 1610 KHz am for park and
shuttle information as you drive in through Red Canyon.
The entrance fee is $20 for seven days, or you can use your National Parks Pass ($50 for one year) to get in. From mid-June to mid-August the Park runs a shuttle bus system to help alleviate the traffic congestion at the viewpoints, and is free once you've paid the entrance fee. If you are catching the shuttle in Ruby's Inn, a small tourist town just outside the Park, you'll need to go to the Ruby's Inn Business area where you will pay the entrance fee. They are great for day-visitors, but not at all useful for photographers whishing to get those sunrise and sunset shots; the shuttled only run during daylight hours. There are three routes (see map), one that starts outside the park (the Blue line, takes you just inside the park), the Red line (runs only around the main amphitheater), and the Green line, (runs to all the viewpoints South of the amphitheater). The shuttle system might be a good way to explore the Park the day you get there, then you can drive in after dinner for the first night's shoot. Of course, if you are camping in the park then drive right in and head for the campgrounds to claim your spot.
Geology (This section added February 2003)
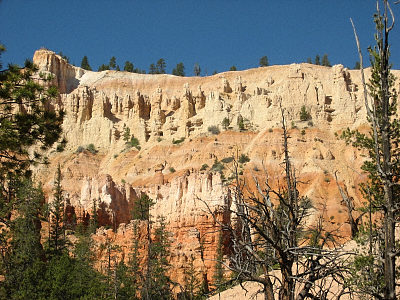
The Pink Cliffs, the highest step (fifth) of the Grand Staircase, make up the Claron formation, and is composed of the white member overlaying the pink member. Both are limestone, not sandstone. The white member has been eroded away from the top of the Paunsaugunt plateau, but is still visible on the Southeast side of the amphitheater, at Bryce Point and the uppermost observation decks above Inspiration point. It is also largely intact near Fairview point.
Across the valley to the ENE from the amphitheater you can see the pink cliffs at Powell Point, at the southern end of the Escalante Mountains (also known as the Table Cliff Plateau to the geologists, and identified as part of the Aquarius Plateau on placards at the amphitheater). There is a fault in the valley (you can see the abrupt transition from pink to gray rock of the Straight Cliffs Formation that marks the Paunsaugunt Fault as you drive East on highway 12) along which the Paunsaugunt Plateau dropped about 2000 feet below the pink cliffs at Powell Point.
The low rolling hills (as they appear from the Plateau; they are actually quite tall and steep, they only lack cliffs) below the pink member are the Straight Cliffs formation. On a clear day you can see this same formation on the slopes of the long Kaiparowitz Plateau, which ends just before Navajo Mountain. There they are known as the Gray Cliffs, the forth of the five steps in the Grand Staircase. Below the Straight Cliffs Formation is the Tropic and Dakota formations (visible in road cuts and small valleys near Tropic, Utah, not from the Plateau), then the Entrada and Carmel Formations of red sandstone visible as the sides of the Paria River drainage seen looking East from Fairview point. By the way, "Paria" is pronounced "pah-REE-ah", not "par-EYE-ah". Looking South from Yovimpa viewpoint you can barely see some of the white Navajo Sandstone cliffs that make the White Cliffs, the third step of the Staircase.
Photography
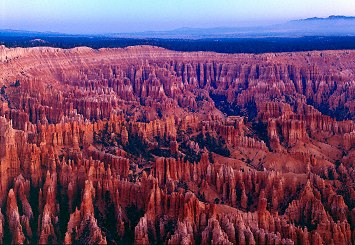
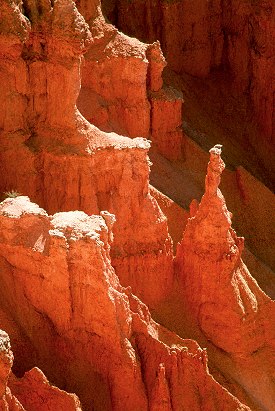
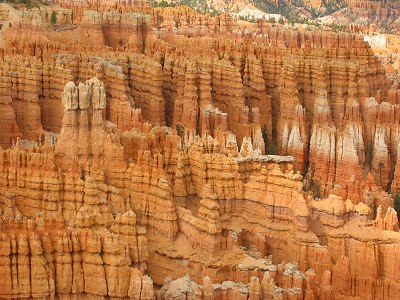
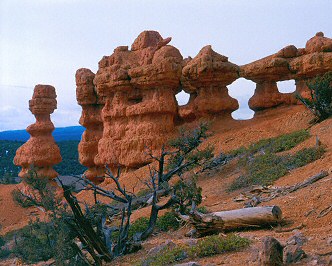
There are three types of shots you get at Bryce: the close shot of individual or small groups of hoodoos (the name for those sandstone spires in the canyon), the medium shot of a small section of the canyon showing row after row of hoodoos, and the sweeping vista, including large parts of the canyon. But in this article I'll try to organize the possible shots you can get by time of day.
Pre-dawn
Some
 of the
best vista shots are made before the sun comes up. Bryce Point is one of the
best spots for the vistas. It stands quite high above the South end of the
amphitheater, and there is a great lighting angle when the sun comes up. Predawn
shots are very bluish, so a warming filter (an 81C is appropriate) is needed.
Fortunately, due to the vast size of the amphitheater, you can easily get shots
that do not include the sky. If you want sky in your shots, which isn't often
due to the clear nature of the sky at that altitude, you'll need at least a
three-stop hard-edged neutral-density graduated filter (I sometimes use a
four-stop filter to darken the sky to match the shadows better just before
sunrise). Be sure your filter can be adjusted up and down, as the horizon will
need to be toward the top of the frame. If you forget your ND grad, improvise by
blocking the sky from the shot using some black object, then revealing the sky
during a long exposure. A yellow/blue polarizing filter can also be fun to work
with at Bryce Point. The shot to the left was made on E100VS film , with the
predawn light modified with a B/Y pol. oriented to impart extra yellow to the
rock.
of the
best vista shots are made before the sun comes up. Bryce Point is one of the
best spots for the vistas. It stands quite high above the South end of the
amphitheater, and there is a great lighting angle when the sun comes up. Predawn
shots are very bluish, so a warming filter (an 81C is appropriate) is needed.
Fortunately, due to the vast size of the amphitheater, you can easily get shots
that do not include the sky. If you want sky in your shots, which isn't often
due to the clear nature of the sky at that altitude, you'll need at least a
three-stop hard-edged neutral-density graduated filter (I sometimes use a
four-stop filter to darken the sky to match the shadows better just before
sunrise). Be sure your filter can be adjusted up and down, as the horizon will
need to be toward the top of the frame. If you forget your ND grad, improvise by
blocking the sky from the shot using some black object, then revealing the sky
during a long exposure. A yellow/blue polarizing filter can also be fun to work
with at Bryce Point. The shot to the left was made on E100VS film , with the
predawn light modified with a B/Y pol. oriented to impart extra yellow to the
rock.
There is a wind problem at Bryce Point. If you stand near the fence, your camera will be buffeted by the rather strong updraft. If you move back three feet you won't feel much of this wind at all. Try to keep back a bit, but it's tricky if the point is crowded and tourists crowd in front of your camera. Fortunately most of them are waiting for the sun, and aren't interested in shooting in the best light for the canyon. Practice your best manners here, chat with other photographers and if you are shooting large format, leave the shutter open so any interested party can look at the focusing screen; they're dying to get a look, and it's a great way to introduce yourself to them. Also, and I really don't like saying this, you'll need to avoid the Wallies. They are the ones dressed funny and are looking at the crowds, not the scenery. Wallies are named after the Wally character in the movie Crocodile Dundee, who talk big but know little, who like to position themselves in prominent tourist locations and talk like they know the area. They never do (I once heard a Wally tell a poor German fellow who was too kind to walk away about the animals in the area, the bobcat, the 'coon, and the varmint; I think he meant the coyote, but he didn't describe it very well). They will be an endless distraction if they start talking to you. They inhabit the viewpoints mostly in the afternoon and evening. Well, you've been warned.
From some of the other viewpoints you will get different vistas, but they are all similar in coloration and shadow depth.
Dawn
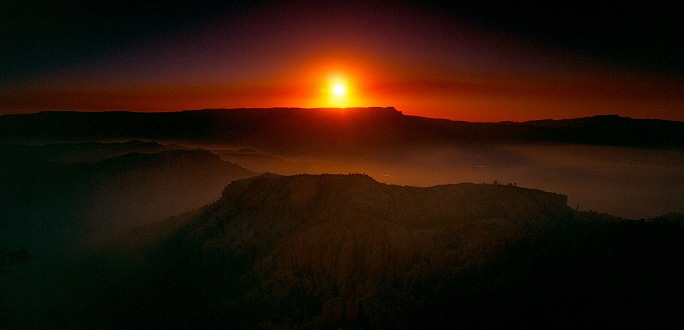
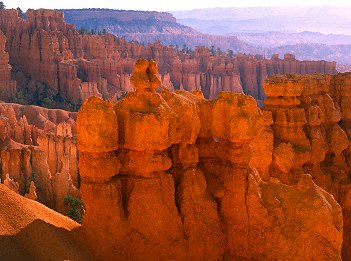
Mid-June dawn from Bryce Point.
Bruce Wilson, 2002
The sun rises over the Aquarius plateau (actually, it comes up over the Escalante Mountains and Powell Point, but many consider this formation part of the plateau; I don't) about 10 minutes after the official sunrise time reported on my GPS or posted at the visitor center. The sunrise is actually a little better from April to May and in September when the sun come up through a notch between Powell Point and Boulder Mountain farther to the East, giving a little more color to the light and a little better angle for cameras at Bryce Point.
The dawn
light is surprisingly harsh on these rocks. Shadows are at least three stops
deep in the early minutes after sunrise, before the reflections have started
filling in the shadows. With slide film it's a hard shot to get. Digital cameras
shooters who can lower the contrast, and print film shooters will do okay with
these shots.
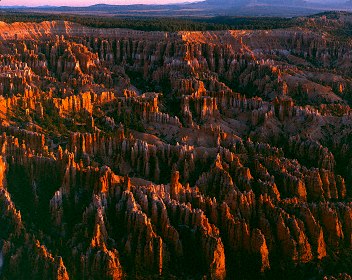
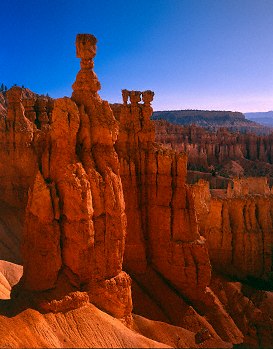
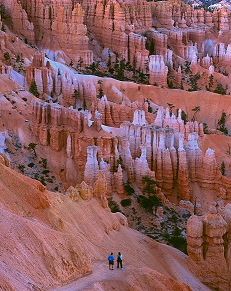
I've found it's best to wait a few minutes for the sun to get high enough to shine onto the hoodoos brightly enough to have them reflect that red light on the shadowed-sides of their neighbors. Then you'll get shots with low enough contrast for slide film. By the way, the photograph on the front of the Bryce Canyon Official Map and Guide, the photo we all want to get, was shot about 30 minutes after sunrise from Bryce Point, and has the sky cropped out. You'll need a 2-stop hard-edged ND grad if you want the sky. While you are at Bryce Point, look across the canyon to Sunset Point (you'll know where it is because of all the tourists using flashes). Now imagine getting from there down to the bottom of the canyon. That's what you're about to do!
Mid Morning
There is
only one place to be mid morning (about 1.5 hours after sunrise), and that is on
the canyon trails. I think the best route is to do the Navajo Loop Trail. Start
at Sunset Point (with your camera, tripod or monopod [monopods will give you
support while climbing out], wide-angle lenses, b/y polarizer, regular
polarizer, and
soft-edge ND grads, and at least 2 quarts of water), and find the path leading
down from the overlook itself. After one switchback you come to a "Y" in
the trail. Take the one to the left (the north side of the loop; yes, those
switchbacks on the south trail look inviting, but there are some on the north
trail too). Keep your eyes up and look around for shots. They are all over the
place, and the morning light is fabulous! As you move down, you'll get to the
switchback section, and one of the tunnels.
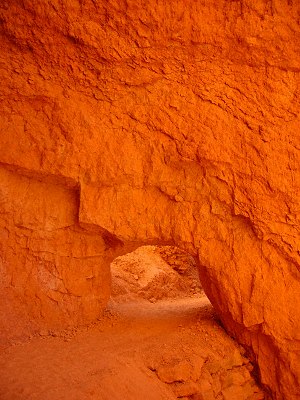
It is
in the mid-morning light, shooting up toward the sky at orange rock, that you'll
discover why they invented the yellow/blue polarizing filter. It is a truly
magical filter for shooting the rock, especially if you love the bold look and
deep colors. The y/b pol set to make the sky bluer will do a nice job of
balancing the exposure of the rocks and the sky, so you won't need to use any
grad filters in the canyon for all but one shot. We'll get to that in a minute.
Soon you'll get to the switchbacks. I think the North trail switchbacks are
the best to shoot from the top. This set isn't as long as the South side set,
but it makes a better photograph as they aren't as wide and you can shoot them
with a 28 or 24mm lens. The South set needs a 20mm or wider lens to get, and
because of a fin in the way you don't see them all from
the top.
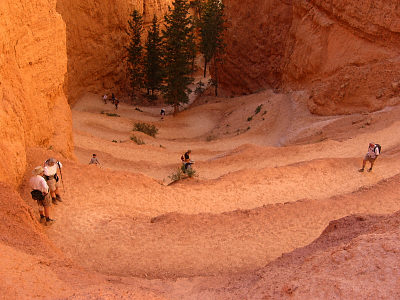
As you continue around the trail you'll see the double bridge (kind of
difficult to shoot), then you'll get to the big junction. You are now about
halfway through the Navajo loop, and here you can take some of the other trails
if you want to, but for most of us continuing the Navajo loop on the right-hand
trail is the best option. The rest of the loop is uphill all the way, about 600
feet of uphill. Take a big drink of water, and head up toward Wall Street. Along
this open part of the trail you can get some shots of the viewpoints on the rim
of the canyon, and work in a few trees in the foreground.
As you get back in among the fins, a startling sight awaits you! You turn a corner, and you'll see:
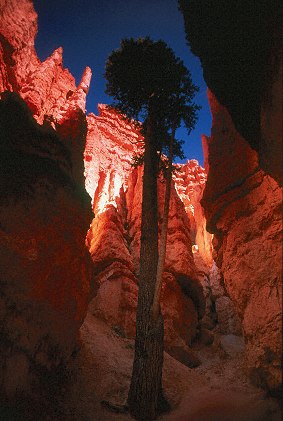
It's a Douglas fir tree standing in the middle of a very narrow canyon. You are at the bottom end of Wall Street, and capturing that tree in one shot is why you brought the soft-edge ND grads. The upper part of the canyon is brightly lit, and the bottom part is in deep shadow. By using both an ND grad and a polarizing filter you can work out an exposure that might work. I suppose that there might be other times of the day, late afternoon, when the light will be better, but I've never hiked the canyon that late in the day (it gets hot down there!), so I don't know for sure.
Shots inside Wall Street itself are also tricky to get, as the walls are very dark, and the ends seem very brightly lit in comparison (although in reality all you see is reflected light at either end). So get what shots you can, but don't plan on hanging them on your wall.
Work your way up to the switchbacks. I counted them once, and turned to the right 14 times. The pitch of these switchbacks is about 45 degrees, so drink a lot of water, and rest every other switchback. If you see any overweight tourists who are struggling, offer to help carry some of their load if you still have a hand free (it's the Utah thing to do, if you don't want to look like a tourist yourself). You can get a few shots from the bottom, but light control will be needed (try using the ND grads and/or b/y pols). You'll want to get a shot of the switchbacks from the top, not because it's a good shot, but as a memorial to your effort getting up there!
Finish the trail back to the viewpoint (which is, I think, the hardest part of the climb). Rest. Rest some more. There aren't any good shots until the mid afternoon anyway. If you are unfamiliar with the southwest, be sure to join the walk with the ranger that starts at about 8:30 at Sunset Point. Very informative, and fun. Not a lot of time for setting up cameras and tripods, but if you are shooting freehand, then it's just great. They walk the Navajo loop in the opposite direction I've described, but the north trail shots are still there at 10 a.m. when you start climbing out.
Mid afternoon
The 18 mile road to
the end of the park is nice. Here is where the shuttle busses really come in
handy. Take the green line out of the visitors center or Sunset Point. You'll
travel all the way to the South end of the park without stopping. Rainbow Point
and Yovimpa Point have a look that is similar to the amphitheater, but different
in a lot of ways. I like to have a big map at Yovimpa to try to make sense of
all the scenery you can see there. It's a vast panorama, and on a clear day you
can see a lot of the Grand Staircase (unfortunately from the upper side, so it
isn't photogenic). There is a hiking trail starting at Rainbow, but it never
gets very near the edge of the canyon for any good hoodoo shots. There are some
nice panoramic vistas at the end of the bristlecone trail, which takes you out
to the very end of the Paunsaugunt Plateau.
I like the shuttle system because it forces you to stay at each point on the way back until the next shuttle arrives, and you can get good shots at every point. It may take a couple hours to get all the way back to the visitors center, taking pictures the whole way.
By the way, if you don't want to do the amphitheater hike in the morning, the view points along the road offer a very different view in the morning and afternoon, and might be worth two trips out and back, one in the morning and another in the early afternoon. Telephoto lenses will help isolate the reflection-illuminated hoodoos in the morning.
Late afternoon
Late afternoon
is a good time for close-up shots in the amphitheater. The trouble with evening
shots is that the
rim blocks the sun shining on the Silent City part of the amphitheater (just to
the South of Sunset Point), so mid-afternoon is the best time. Shots can be had
anywhere along the rim trail between Sunset Point and Inspiration Point. It's a
half-mile trail, and worth the effort. You climb uphill from Sunset to
Inspiration, so maybe the Inspiration to Sunset direction is best after doing
the canyon hike in the morning. As long as the shuttles are running, you can get
back to Inspiration easily enough. If you have an overcast day, thank your lucky
stars, because the afternoon light is harsh. The overcast light really
highlights the horizontal striations in the weathered hoodoos. Some trips to Bryce have resulted
in useless afternoons because there were no clouds at all to help control the
exposure, and other times I found a nice angle to get the hoodoos with a nice
reflected backlight. Walk around and see what you can do with
the hoodoos. Pay close attention to the reflected light, as you'll need it to
moderate the sunlit/shadow contrast.

Evening
Again, I think Bryce Point is the best place to be for the evening shots. Thing is, there isn't any one good moment for a shot in the evening at Bryce. The sun sets to the far left of the amphitheater at Bryce Point, and there just isn't any better location, so you'll never get a shot of the actual sunset from anywhere at Bryce.
Instead concentrate on the wonderful side-lighting of the hoodoos that aren't in a shadow already, and on the great head-on lighting of Powell's Point. Again, big vistas work nicely before the sun goes down. You can also get some very nice telephoto shots from any amphitheater viewpoint during sunset.
After sunset
a whole new type of shot opens up, once the hoodoos are in shadow. Again, make
sure you have a warming filter to deal with the blue skylight, or set your
digital camera on 'cloudy day' (this is especially important if you have any of
the white bands in the shot, as they will look a particularly bright blue in the
light of dusk, especially on Velvia). I think the best shots come from between Sunrise
and Sunset points, where you get some fairly open views of the white ash layers
in the pink cliffs. These white layers do some nice things in the blue light of
twilight, so spend a little time on the rim trail and find some of these shots.
Nighttime
Due to the altitude, being far from big cities, and because Heaven smiles on Utah, the nighttime sky is glorious at Bryce. If you have the patience for long exposure nighttime shots, and the energy after a busy day, I think you could get some absolutely marvelous shots from down in the canyon with hoodoos in the foreground and the stars circling overhead. With a flashlight and a few colored gel filters you could paint the hoodoos with light for an even more colorful effect. After the busy days I've had there, I've never had the energy to get one of these shots. But I'd love to see the shots you get.
Winter (this section added February 2003)
 There is a special appeal to the shots shot here in winter, especially shots
in the amphitheater. The hoodoos in the bowl make for a very busy shot, and an
element of order is often needed to tame the many areas of contrast (the
vertical hoodoos, the horizontal striations in the stone, the overlapping
forms). A horizontal layer of snow serves this function very nicely. By
demarcating the horizontals, the verticals stand out as a compositional element.
It's sort of the opposite effect of shooting with the very first light that
highlights the vertical sides of the hoodoos.
There is a special appeal to the shots shot here in winter, especially shots
in the amphitheater. The hoodoos in the bowl make for a very busy shot, and an
element of order is often needed to tame the many areas of contrast (the
vertical hoodoos, the horizontal striations in the stone, the overlapping
forms). A horizontal layer of snow serves this function very nicely. By
demarcating the horizontals, the verticals stand out as a compositional element.
It's sort of the opposite effect of shooting with the very first light that
highlights the vertical sides of the hoodoos.
Bryce, at 8000+ feet, gets cold in winter. Camping is still available in part of Loop A in the North campground (heated restrooms!) but is limited to about 15 sites, which will fill up on a holiday weekend. The visitor center will provide free snow shows (with credit card deposit to cover damage and loss) when the snow is a foot deep or more. If there isn't much snow the road to Rainbow Point will be open and plowed, but typical winters will have the road closed either at Fairview Point or just past the turn to Bryce and Inspiration Points. Paria Overlook is closed for cross country skiing. The Lodge is closed from November 1st, but many motels outside the park remain open year round.
During winter the full moon rises above Powell Point, a very nice shot from Inspiration one day before the full moon peaks.
In winter, the viewpoints to the south of the amphitheater usually look best in the mid morning, when the brightly-illuminated hoodoos can compete with the brightness of the snow.
Under the Rim
If you like backpacking, and have a camera system set up for backpacking, then the Under The Rim trail is for you. You need a backcountry permit from the visitor center (they are free), and you can get some nice shots of the pink cliffs from below (the ones most of us never see from on top of the plateau). Make sure you have a good trail map, like the National Geographic Trails Illustrated map of Bryce Canyon (map number 219).
Outside the Park, Red Canyon
There is one more place for shots, Red Canyon, the one you passed through on your way in from Pangwitch. I've found that mid-morning shots are good here, and that a polarizer can make these shots in the North side of the canyon very colorful indeed. Many shots can be had using a telephoto from the side of the highway, but there are some trails that get you right up to the canyon walls. A couple things to note about the red Canyon State Park, there is camping (37 sites), showers (more accessible than the ones in Bryce), and mountain bikes are allowed on the trails (good if you bike, bad if you don't like being surprised by bikes heading down).
Outside the Park, Kings Creek
Bryce sits on the very edge o the Paunsaugunt plateau. If you'd like to see what the middle looks like, you might want to stay at Kings Creek campground, in the Dixie National Forest. You access it along a dirt road off Highway 12, about 3 miles to the West of the Ruby's in turnoff. The campground it located next to Tropic reservoir, about 11 miles down the dirt road. It's a heavily wooded area, rather like the Sunset campground area in Bryce, only more so. I don't know of any spectacular shots from the area, but it is a nice campground, away from most of the tourists. The drive along the dirt road to the South is an interesting one, following the river valley back into the forested mountains.
Outside the Park: Losee and Canto Canyons (This section added February 2003)
 Between Panqwitch and Red Canyon is a signed turnoff to the north indicating
Losee and Canto Canyons (brown-colored signs in Utah rarely disappoint the
curious photographer). Both canyons are part of the Red Canyon formation of
limestone, a redder version of the pink cliffs. At the Losee Canyon parking area
(about 2 miles in (vault toilet available, no tables, no camping) is a trailhead
to various locations. The most enjoyable of the trails is the Arches trail,
which exits the area to the north up the wash. After an easy 1/10th mile, you
find the 1/2 mile loop. In the loop you will climb about 500 feet, but the trail
is well maintained, and is of moderate difficulty. I suggest taking the
right-hand fork to go up, as it will present the arches most dramatically. The
arches aren't very big, but they are interesting and quite photogenic (you will
need some careful composition to minimize the appearance of the trail in the
shot, and of the apparently immovable sawed log just off the trail that rather
spoils a more balanced composition that includes some evergreen groundcover).
Just past the arches section is a slope by which you can reach the upper cliffs,
with marvelous viewpoints of the upper reaches of Losee canyon (in the
afternoon) or intimate vistas of the tiny amphitheater to the northwest. If you
do venture off trail, please watch out for the small (one foot) and sometimes
very tiny (1/4 inch) trees just getting a start on life. Also look for a few
bridges that form underneath the hard gray limestone layer. There is a very
prominent conglomerate band in the pink limestone, mirroring very nicely the
conglomerate-filled banks of the wash below.
Between Panqwitch and Red Canyon is a signed turnoff to the north indicating
Losee and Canto Canyons (brown-colored signs in Utah rarely disappoint the
curious photographer). Both canyons are part of the Red Canyon formation of
limestone, a redder version of the pink cliffs. At the Losee Canyon parking area
(about 2 miles in (vault toilet available, no tables, no camping) is a trailhead
to various locations. The most enjoyable of the trails is the Arches trail,
which exits the area to the north up the wash. After an easy 1/10th mile, you
find the 1/2 mile loop. In the loop you will climb about 500 feet, but the trail
is well maintained, and is of moderate difficulty. I suggest taking the
right-hand fork to go up, as it will present the arches most dramatically. The
arches aren't very big, but they are interesting and quite photogenic (you will
need some careful composition to minimize the appearance of the trail in the
shot, and of the apparently immovable sawed log just off the trail that rather
spoils a more balanced composition that includes some evergreen groundcover).
Just past the arches section is a slope by which you can reach the upper cliffs,
with marvelous viewpoints of the upper reaches of Losee canyon (in the
afternoon) or intimate vistas of the tiny amphitheater to the northwest. If you
do venture off trail, please watch out for the small (one foot) and sometimes
very tiny (1/4 inch) trees just getting a start on life. Also look for a few
bridges that form underneath the hard gray limestone layer. There is a very
prominent conglomerate band in the pink limestone, mirroring very nicely the
conglomerate-filled banks of the wash below.
Canto Canyon, another mile along the road (note that the road crosses several washes, and should not be attempted during or just after a rainstorm) is a flat hike that takes you back into a more intimate and verdant version of the Bryce Canyon. Hoodoos line the walls of the canyon after a half mile. If they day isn't too hot, just walk up the wash itself.
Past Canto Canyon, about 1/2 mile where the road forks, is an area loaded with jasper. Sometime in the past debris from an ancient cave was washed into the area. The jasper is semitransparent, and often varicolored from golden brown to rose pink to deep red. Kids might really enjoy looking for rocks here, if you don't mind toting them around.
Other resources
I've found that one book really stands out if you are shooting in Southern Utah. It's called Photographing the Southwest, Volume 1, by Laurent Mertres. It's published by PhotoTripUSA. A companion Volume 2 covers Northern Arizona and New Mexico.
If you are the type who likes to get down into the canyon, especially if you like climbing, then there is a web site just for you: Tom's Utah Canyoneering Guide. A marvelous site about locating and hiking/climbing some of Utah's most scenic canyons. No information on Bryce here, but sections on Zion, Grand Staircase-Escalante, San Rafael Swell, Arches/Moab, etc.
The expanded Bryce Canyon National Park What-to-do Page
Get your own National Parks Pass
Also note that Bryce is open through the winter, and there are many photographic opportunities to be had with the snow around the hoodoos. I've never visited Bryce in winter, but the North campground is open all year, and with snowshoes and enough time you should be able to shoot all around the rim trail, and even hike down into the canyon if you watch out for ice.