
Film (and digital) Saturation
Controlling saturation is an exercise in controlling brightness and contrast. Color film, especially reversal film, responds to exposure changes by changing it's saturation. Underexpose and you get colors so rich they become very dark; overexpose and the colors become so light they bleach out. The trick to saturation (and this applies to digital shooters, too) is as follows:
ND Grads All parts of your image should have approximately the same
exposure, so that any one part of the image is neither too light or too dark.
This is why I used an ND graduated filter in my Tropic, Utah shot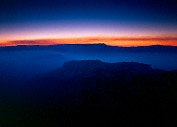 , to bring the brightness of the sky down to match the rest of
the slide. A neutral-density graduated filter is a filter that is half gray and
half clear. It is used to darken only the sky in a shot, and leave the rest of
the scene untouched. That way I could then bring out the colors of both the
relatively bright sky and the backlit haze below. Without the ND grad the sky would be burned out
with no color left, or the haze would be too dark to show any brightness at
all. The ND grad is a rectangular filter, and is used in a special holder that
allows for rotation of the filter and to slide the filter up and down so that
the transition (a sharp edge for a hard grad and a gentle lightening for a soft
grad) to match the horizon.
, to bring the brightness of the sky down to match the rest of
the slide. A neutral-density graduated filter is a filter that is half gray and
half clear. It is used to darken only the sky in a shot, and leave the rest of
the scene untouched. That way I could then bring out the colors of both the
relatively bright sky and the backlit haze below. Without the ND grad the sky would be burned out
with no color left, or the haze would be too dark to show any brightness at
all. The ND grad is a rectangular filter, and is used in a special holder that
allows for rotation of the filter and to slide the filter up and down so that
the transition (a sharp edge for a hard grad and a gentle lightening for a soft
grad) to match the horizon.
Polarizer You control specular reflections through the use of polarizing filters. Having highlight in your scene, especially a thousand little highlights all over the leaves, will bleach out the colors (a good portion of the light that comes from reflections is white instead of colored). A polarizing filter will block the reflections off plants and water so all the light that hits the film will be colored and your saturation improves a lot. You can also use polarizing filters to bring the brightness of the sky down to match the land at certain times of day (usually early morning and late afternoon, when the sun illuminates the sky head on but illuminates the land at an oblique angle). At noon, or at right angles to the sun the polarizer will introduce more problems than it solves, unless you are going for that high-contrast art look.
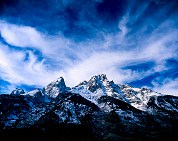 A Small peak in the Tetons An example of darkening the sky using the polarizer to overemphasize contrast. |
Examples of overuse of the polarizer: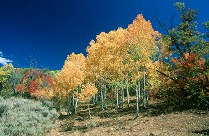 |
The polarizer is darkening the sky in these wide-angle shots more
perpendicular to the sun.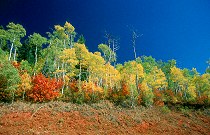 |
Underexposure Overall exposure can make a difference. Any film saturates if slightly underexposed, so if you really want the colors, underexpose by a third or maybe half a stop. Negative film also responds to underexposure, but the end result usually isn't as dramatic as with reversal film. Instead, underexposure can be applied in printing the negative to get the enhanced saturation at the expense of overall brightness in the print. Speaking of printing your film, often you must try to strike a balance between the brightness of the print and the richness of the colors. Negative papers by Kodak and Fuji have been tending toward higher contrast and higher saturation, and if you have a color darkroom handy, you can select papers for printing that can either enhance saturation or desaturate the image, giving you the opportunity to fine-tune the saturation.
 Skyline Arch and Juniper -1/3 stop exposure, pol. |
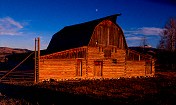 Barn on Mormon Row, Teton N.P. -1/2 stop exposure, pol. |
Films Chose a film known for saturating. Fujichrome Velvia, Kodak 100VS , Fuji Superia Reala, and others, are well known for the high saturation they deliver. Fuji's Astia, for example, is known as a non-saturating reversal film, so avoid it (and it's consumer sibling, Sensia) if you need color. All photos included in this article were shot on Velvia.
Overcast Light/Warming Filter The type of light illuminating a subject has a great affect on the saturation. Scenes lit by bright sunlight will look good to our eyes because they are so well lit, but your exposure will adjust the brightness to suit the film. It turn out that the best saturation of foliage is had by shooting on overcast days. The uniform lighting creates the best situation for maximizing saturation. The downside of shooting in overcast conditions has to do with the color of the light. Overcast light had a decided blue tint, and this must be corrected by using a warming filter (designated as 81A through 81E). The 81C filter is probably the best. It is an amber colored filter that compliments the blue of skylight, which will remove the blue of an overcast shot. Once the blue is removed, all colors in the scene become very vivid. The 81A filter is a light amber, providing little correction, and the 81E is a very deep amber, which usually over-corrects overcast lighting.
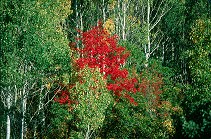 A Red Maple amid Aspen This shot demonstrates the sort of saturation Velvia produces when using a polarizer in sunlight. |
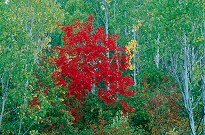 A Red Maple amid Aspen 2 The same tree, this time shot on a cloudy day, no polarizer. Filtering was done digitally on the scan. |